Drone Legacy Input
Drone Legacy Input
Legacy input for drones allows you to use controllers or joysticks that aren't compatible with Steam input, such as radios from FrSky, Taranis, Jumper, Radiomaster, EdgeTX, OpenTX, and others.
Legacy input is an experimental feature. It may or may not work depending on a variety of factors, and it has not been tested with all types of FPV radios.
If you have additional information to add for specific radios, feel free to share that information here by suggesting edits, or by sharing that information with your community!
If you have a controller such as Xbox, Playstation, Nintendo, or any of the other common standards well recognized by Steam, then you most likely don’t need legacy input because you can either use the built-in control set or rebind in the Steam controller configurator.
If your controller does not work in steam input for one reason or another, you’re in the right place! This guide will walk you through how to identify your controller’s capabilities and show you where to set up legacy input bindings to bypass steam input.
Step 1: Get to the Steam input page
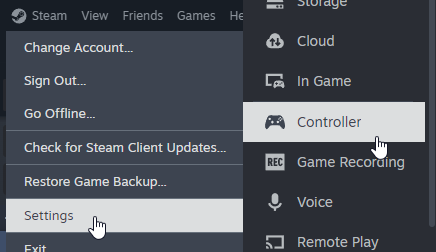
When setting up a new controller from scratch, you first need to identify whether or not your controller supports Steam Input. Open Steam's settings Controller settings (Steam > Settings > Controller).
You can only use legacy input on PC. Quest and mobile versions of VRChat are not supported.
Step 2: Identify what state your controller is in
Once you’ve plugged in your controller, there are three potential states it could be in:
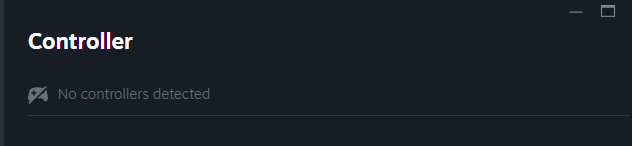
Not detected: Probably a bad sign, likely firmware issues. Check device manager to ensure that the hardware is being detected at the operating system level. You may need to install additional firmware or software to get it to the point where it is detected here.
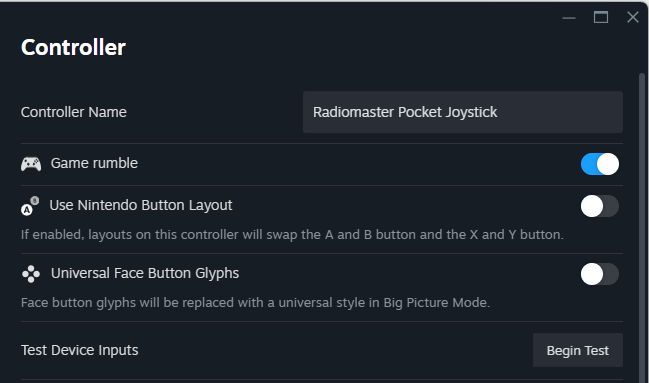
Detected and set up: If the controller is in this state and functioning properly, then it can be rebound in steam input. However if a controller is in this state but does not work, going through legacy input might be your best option. In order to utilize legacy input you will need to switch a controller out of steam input mode. Go into the “Test Device Inputs” menu and click “Reset Device Inputs” to take it out of Steam Input.

Detected but not set up: In this state, this controller will be ignored by Steam Input, and legacy input will be utilized instead. If you aren’t sure about this controller, it’s worth attempting the setup process and trying to control your drone through Steam Input. But if you’ve tried that and there was some reason it didn’t work, follow along this guide to proceed.
Next, you'll learn how to create keys within a config.json file to map legacy inputs from scratch.
Step 3: Try your controller in a VRChat input testing world
To continue, you must be familiar with the basics of JSON. If you're not already familiar with JSON, do one of the following things:
- Use
config.jsonmappings created by the community and skip to step 7.- Use an automated tool to create a
config.jsonmapping and skip to step 7.- Or learn more about the structure of JSON and config files and create your own mapping now.
Visit the Controller Input Testing World.
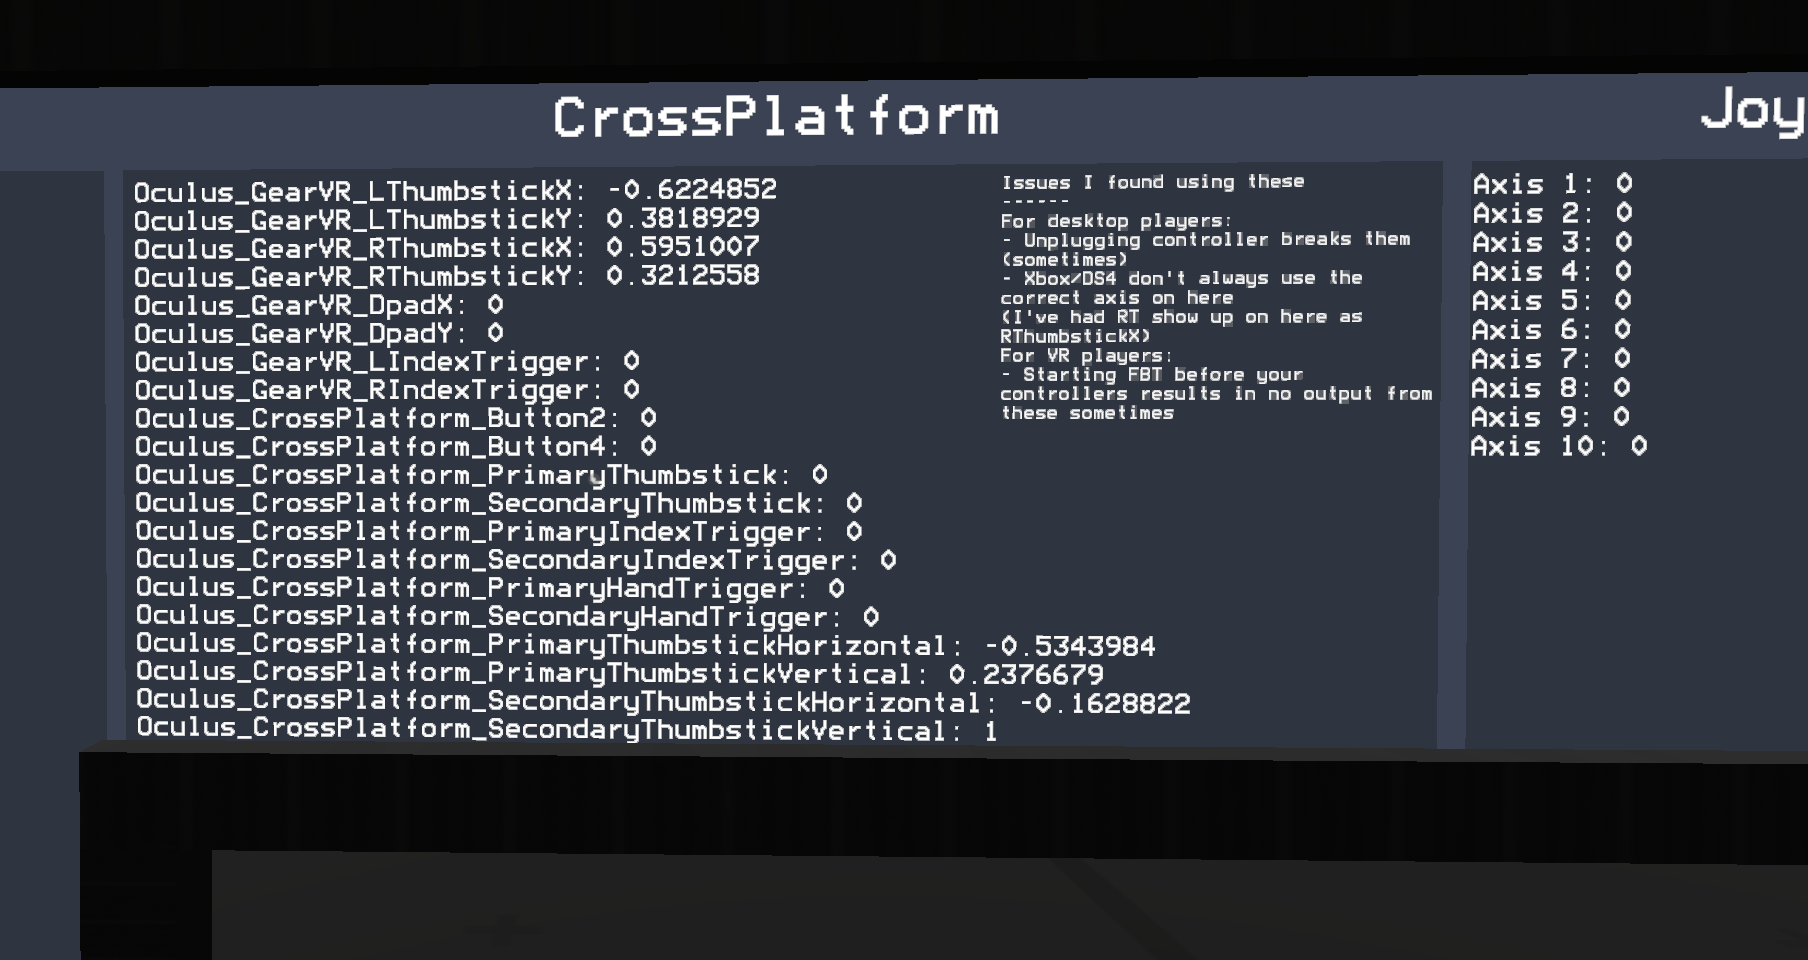
This is just one example of a world that displays legacy input axes. It is not the only one, and others may use similar code to display it in different ways.
If your controller works in worlds like this, which reads inputs with Input.GetAxisRaw, you should see the numbers on the screen change when you move the inputs. If it does not work, you may have to investigate and troubleshoot further to get your specific controller and environment set up properly. Try taking a closer look at what state your controller is in with step 2. Once you have confirmed that your controller is being detected by legacy input worlds in VRChat, you can proceed with the next steps.
Step 4: Map input axes
The examples on this page show the mapping process of the RadioMaster pocket. Different controllers might have different mappings, but the mapping process in general should be the same no matter what you have. Follow the same process, but you may diverge in the exact details.
Move the sticks of your controller in the world above. Observe and note down which axes in-client correspond to the physical input you want to bind them to.
For example, look at what happens when you move the left stick of your controller up and down. In the case of Radiomaster pocket, this appears to be Oculus_GearVR_RThumbstickX, but you might see something different. Don't worry about the axis names; it's common for them to be scrambled, and that's exactly why we have systems to map from one layout to another. Repeat this with both horizontal and vertical on both the left and right sticks of your input device.
Throughout the process of mapping your axes, note down the difference between the minimum value and the maximum value. In the case of horizontal inputs, the expected minimum should be on the left, and for vertical inputs, the expected minimum should be on the bottom. With some axes, you may find them to already go cleanly between -1 and +1 from left to right and bottom to top. In those cases, you can leave the min and max inputs at the default. If the reported input does not match up with the default, you can define the min and max manually. Take note of axes that are different from the default.
Optionally, note down any utility inputs you would like to
At the end of this process, you should have some notes that look something like this:
- left horizontal:
Joy1 Axis 4 - left vertical:
Oculus_GearVR_RThumbstickX - right horizontal:
Oculus_GearVR_LThumbstickX - left vertical:
Oculus_GearVR_RThumbstickX(Inverted)
Step 5: Map input buttons (Optional)
This is not required to fly, but you may also want to map some utility functions to various buttons, switches, levers, and pots on your controller. To do this, we're going to use a process similar to the previous step.
Instead of the min and max defining the range of the axis, in the case of button inputs, they will represent the area in which the axis will read as "true". For example, if I have a button that reads 0 when not pressed and 1 when pressed, I would set the min and max to surround that 1.
Some inputs will trigger the action once when the input first enters the desired range. In order to activate those again, you would need to move it out of the range and then back in. These types of inputs are ideal to map onto momentary push buttons that automatically return to the default state when you let go.
- Picture:
Fire1(between 0.5 and 1.5)
Some inputs may perform some action for as long as the axis is within the desired range. If you bind them to a momentary button, it will be a hold action that stops when you release. If you bind them to a toggle switch, then you can flick them to the desired spot and leave it there.
- self level mod:
Fire1(between 0.5 and 1.5)
You may also bind multiple functions onto a single axis. For example, if you have a 3-position switch, an ideal setup would be to have one position do nothing, the second position do turtle, and the third position do respawn. This is a good way to put all of your crash-recovery logistics in a single place. If you don't have a 3-position switch, you can also just put turtle and respawn on the same button, and since respawn requires a hol,d then it will naturally respawn after 2 seconds of turtle mode failing.
- Turtle:
Joy1 Axis 8(between -0.5 and 0.5) - Respawn:
Joy1 Axis 8(between 0.5 and 1.5)
Another use of multiple functions on a single axis is to bind all the different flight presets onto one place. There are 4 flight presets, so if you have a dial with 4 positions, then you can set it up so that each position puts you on a different flight preset.
- Micro:
Joy1 Axis 6(between -1 and -0.5 - Cinematic:
Joy1 Axis 6(between -0.5 and 0) - Freestyle:
Joy1 Axis 6(between 0 and 0.5) - Racing:
Joy1 Axis 6(between 0.5 and 1)
Step 6: Create your config file
Once you know what inputs you care about and what axis they’ll be mapped to, you can start assigning them to specific endpoints in the config file.
For each input key, you must provide a json object which can contain 3 others keys: source, min, and max. These correspond to the notes you took in the previous step. Source is required, but if you leave min and max blank they will default to -1 and +1.
Depending on the controller you are attempting to set up, you might not be able to bind all of these inputs. That is perfectly fine, as none of these are technically required except for legacy_devices.
The expected format for legacy_devices is to provide the unity name of your controller, which may be different from the windows or steam name. You can find this name in a few different ways:
- Start VRChat with the controller connected and then look at your VRChat logs to find the "Environment info" section near the top. Inside of that is an entry for connected controllers. Use the names found in there. If you cannot find your controller here, it is likely because your controller is set up through steam input and that will make it invisible to legacy input.
- Go to a world which displays the results of the "Input.GetJoystickNames" function
- Open any unity editor and plug in a controller, then observe the console
| Key | Type | Description | Example |
|---|---|---|---|
legacy_devices | String array | Defines which devices are intended to function with this binding set. Legacy input will not work unless there is a device connected with a name from this list. | "legacy_devices": [ "Radiomaster Pocket Joystick" ], |
drone_left_horizontal | Axis | Defines the input axis that is intended to control the left stick’s horizontal movement. In default mode 2, this will control yaw | "drone_left_horizontal": { "source": "Joy1 Axis 4", "min": -1, "max": 1 }, |
drone_left_vertical | Axis | Defines the input axis that is intended to control the left stick’s vertical movement. In default mode 2, this will control throttle | "drone_left_vertical": { "source": "Oculus_GearVR_RThumbstickX", "min": -1, "max": 1 }, |
drone_right_horizontal | Axis | Defines the input axis that is intended to control the right stick’s horizontal movement. In default mode 2, this will control roll | "drone_right_horizontal": { "source": "Oculus_GearVR_LThumbstickX", "min": -1, "max": 1 }, |
drone_right_vertical | Axis | Defines the input axis that is intended to control the right stick’s vertical movement. In default mode 2, this will control pitch | "drone_right_vertical": { "source": "Oculus_GearVR_LThumbstickY", "min": 1, "max": -1 }, |
drone_picture | Click button | When activated, the drone will take a picture and save it according to your picture settings | "drone_picture": { "source": "Fire1", "min": 0.5, "max": 1 }, |
drone_self_level_mod | Hold button | While held, temporarily inverts self-leveling behavior. | "drone_self_level_mod": { "source": "Fire1", "min": 0.5, "max": 1 }, |
drone_self_level_toggle | Click button | When activated, toggles self-leveling mode | "drone_self_level_toggle": { "source": "Joy1 Axis 5", "min": 0.5, "max": 1 }, |
drone_altitude_hold_mod | Hold button | While held, temporarily enforces altitude hold more strictly | "drone_altitude_hold_mod": { "source": "Fire1", "min": 0.5, "max": 1 }, |
drone_fpv_toggle | Click button | When activated, toggles you in or out of FPV mode | "drone_fpv_toggle": { "source": "Joy1 Axis 7", "min": 0.5, "max": 1 }, |
drone_respawn | Hold button | If held for 2 seconds, teleports your drone back to you | "drone_respawn": { "source": "Joy1 Axis 8", "min": 0.5, "max": 1 }, |
drone_turtle | Hold button | While held, activates “turtle mode” which attempts to flip the drone over after a crash | "drone_turtle": { "source": "Joy1 Axis 8", "min": -0.2, "max": 1 }, |
drone_flight_preset_cycle | Click button | When activated, cycles your current flight preset to the | "drone_flight_preset_cycle": { "source": "Fire1", "min": 0.5, "max": 1 }, |
drone_flight_preset_micro | Click button | When activated, sets your current flight preset to micro | "drone_flight_preset_micro": { "source": "Joy1 Axis 6", "min": -1, "max": -0.5 }, |
drone_flight_preset_cinematic | Click button | When activated, sets your current flight preset to cinematic | "drone_flight_preset_cinematic": { "source": "Joy1 Axis 6", "min": -0.5, "max": 0.5 }, |
drone_flight_preset_racing | Click button | When activated, sets your current flight preset to racing | "drone_flight_preset_racing": { "source": "Joy1 Axis 6", "min": 0.5, "max": 1 } |
drone_flight_preset_freestyle | Click button | When activated, sets your current flight preset to freestyle | "drone_flight_preset_freestyle": { "source": "Joy1 Axis 6", "min": 0.5, "max": 1 } |
Example config files:
This is a binding set with all keys pre-added in a blank state. You can use this as a starting point for filling out your own custom binding
{
  "legacy_devices": [
    "PUT YOUR DEVICE NAME HERE"
  ],
  "drone_left_horizontal": {
    "source": "",
    "min": -1,
    "max": 1
  },
  "drone_left_vertical": {
    "source": "",
    "min": -1,
    "max": 1
  },
  "drone_right_horizontal": {
    "source": "",
    "min": -1,
    "max": 1
  },
  "drone_right_vertical": {
    "source": "",
    "min": -1,
    "max": 1
  },
  "drone_picture": {
    "source": "",
    "min": 0.5,
    "max": 1
  },
  "drone_self_level_mod": {
    "source": "",
    "min": 0.5,
    "max": 1
  },
  "drone_self_level_toggle": {
    "source": "",
    "min": 0.5,
    "max": 1
  },
  "drone_altitude_hold_mod": {
    "source": "",
    "min": 0.5,
    "max": 1
  },
  "drone_fpv_toggle": {
    "source": "",
    "min": 0.5,
    "max": 1
  },
  "drone_respawn": {
    "source": "",
    "min": 0.5,
    "max": 1
  },
  "drone_turtle": {
    "source": "",
    "min": -0.2,
    "max": 1
  },
  "drone_flight_preset_cycle": {
    "source": "",
    "min": 0.5,
    "max": 1
  },
  "drone_flight_preset_micro": {
    "source": "",
    "min": 0.5,
    "max": 1
  },
  "drone_flight_preset_freestyle": {
    "source": "",
    "min": 0.5,
    "max": 1
  },
  "drone_flight_preset_racing": {
    "source": "",
    "min": 0.5,
    "max": 1
  }
}
This is an example config for the RadioMaster Pocket. This binding set will not do anything unless you have a Radiomaster Pocket plugged in
{
  "legacy_devices": [
    "Radiomaster Pocket Joystick"
  ],
  "drone_left_horizontal": {
    "source": "Oculus_GearVR_RThumbstickY",
    "min": 1,
    "max": -1
  },
  "drone_left_vertical": {
    "source": "Oculus_GearVR_RThumbstickX",
    "min": -1,
    "max": 1
  },
  "drone_right_horizontal": {
    "source": "Oculus_GearVR_LThumbstickX",
    "min": -1,
    "max": 1
  },
  "drone_right_vertical": {
    "source": "Oculus_GearVR_LThumbstickY",
    "min": 1,
    "max": -1
  },
  "drone_self_level_mod": {
    "source": "Fire1",
    "min": 0.5,
    "max": 1
  },
  "drone_self_level_toggle": {
    "source": "Joy1 Axis 5",
    "min": 0.5,
    "max": 1
  },
  "drone_fpv_toggle": {
    "source": "Joy1 Axis 7",
    "min": 0.5,
    "max": 1
  },
  "drone_turtle": {
    "source": "Joy1 Axis 8",
    "min": -0.2,
    "max": 1
  },
  "drone_respawn": {
    "source": "Joy1 Axis 8",
    "min": 0.5,
    "max": 1
  },
  "drone_flight_preset_micro": {
    "source": "Joy1 Axis 6",
    "min": -1,
    "max": -0.5
  },
  "drone_flight_preset_freestyle": {
    "source": "Joy1 Axis 6",
    "min": -0.5,
    "max": 0.5
  },
  "drone_flight_preset_racing": {
    "source": "Joy1 Axis 6",
    "min": 0.5,
    "max": 1
  }
}
Step 7: Save your config file in the correct folder
VRChat doesn't create a configuration file by default. Once you have created your configuration file, you can put it in %LocalAppdata%Low\VRChat\VRChat. The file must be named config.json and must consist of a valid JSON structure. For more details see the documentation page for config files specifically.
Updated 8 months ago