SteamVR Input 2.0
With the release of version 2024.3.1, VRChat uses a newer, more advanced, and more capable input scheme for SteamVR called SteamVR Input 2.0.
If you've used SteamVR Bindings before for VRChat or another app, the binding process will be familiar. With Input 2.0, however, we've added a much more extensive list of available actions to be bound, and we've properly defined our action sets for different contexts.
You'll find you can do things like binding your movement to the Index Controller's trackpads or creating a chord (combination of inputs) that enables or disables your personal mirror, chatbox, or camera.
Input 2.0 also unlocks Skeletal Input, which allows for better hand poses when using controllers and Hand Tracking on PC.
SteamVR Only!SteamVR Input 2.0 is a SteamVR-specific feature! If you use VRChat on PC through Viveport or Meta's PC application, you won't be able to use custom bindings, skeletal input, or other unique features.
Input 2.0 is not available on standalone devices like Quest or Pico.
Custom Bindings
Input 2.0 gives users tons of control over their controls with customizable bindings. You can customize your bindings either in VR or on the desktop.
To edit your bindings from the desktop:
- Launch SteamVR and make sure the controllers you're going to use are turned on.
- We recommend opening VRChat to test your new bindings as you adjust them. - In the SteamVR desktop app, press the menu icon at the top left and launch "Settings."
- On the Controllers page, press "Show Binding UI" to launch the bindings menu.
- Select VRChat in the bindings menu.
If you'd like to edit your bindings in VR, you can open the main menu in VRChat (while running via SteamVR), head to the Controls page, and press "Edit SteamVR Bindings." This should open the SteamVR Bindings in the SteamVR overlay inside your VR headset.
You may want to start from a clean set of bindings. After selecting "VRChat" in the bindings menu, locate "VRChat Default Bindings" for your current controller and select Activate. Note that bindings use the Steam Workshop for distribution, so it may take a moment to load.
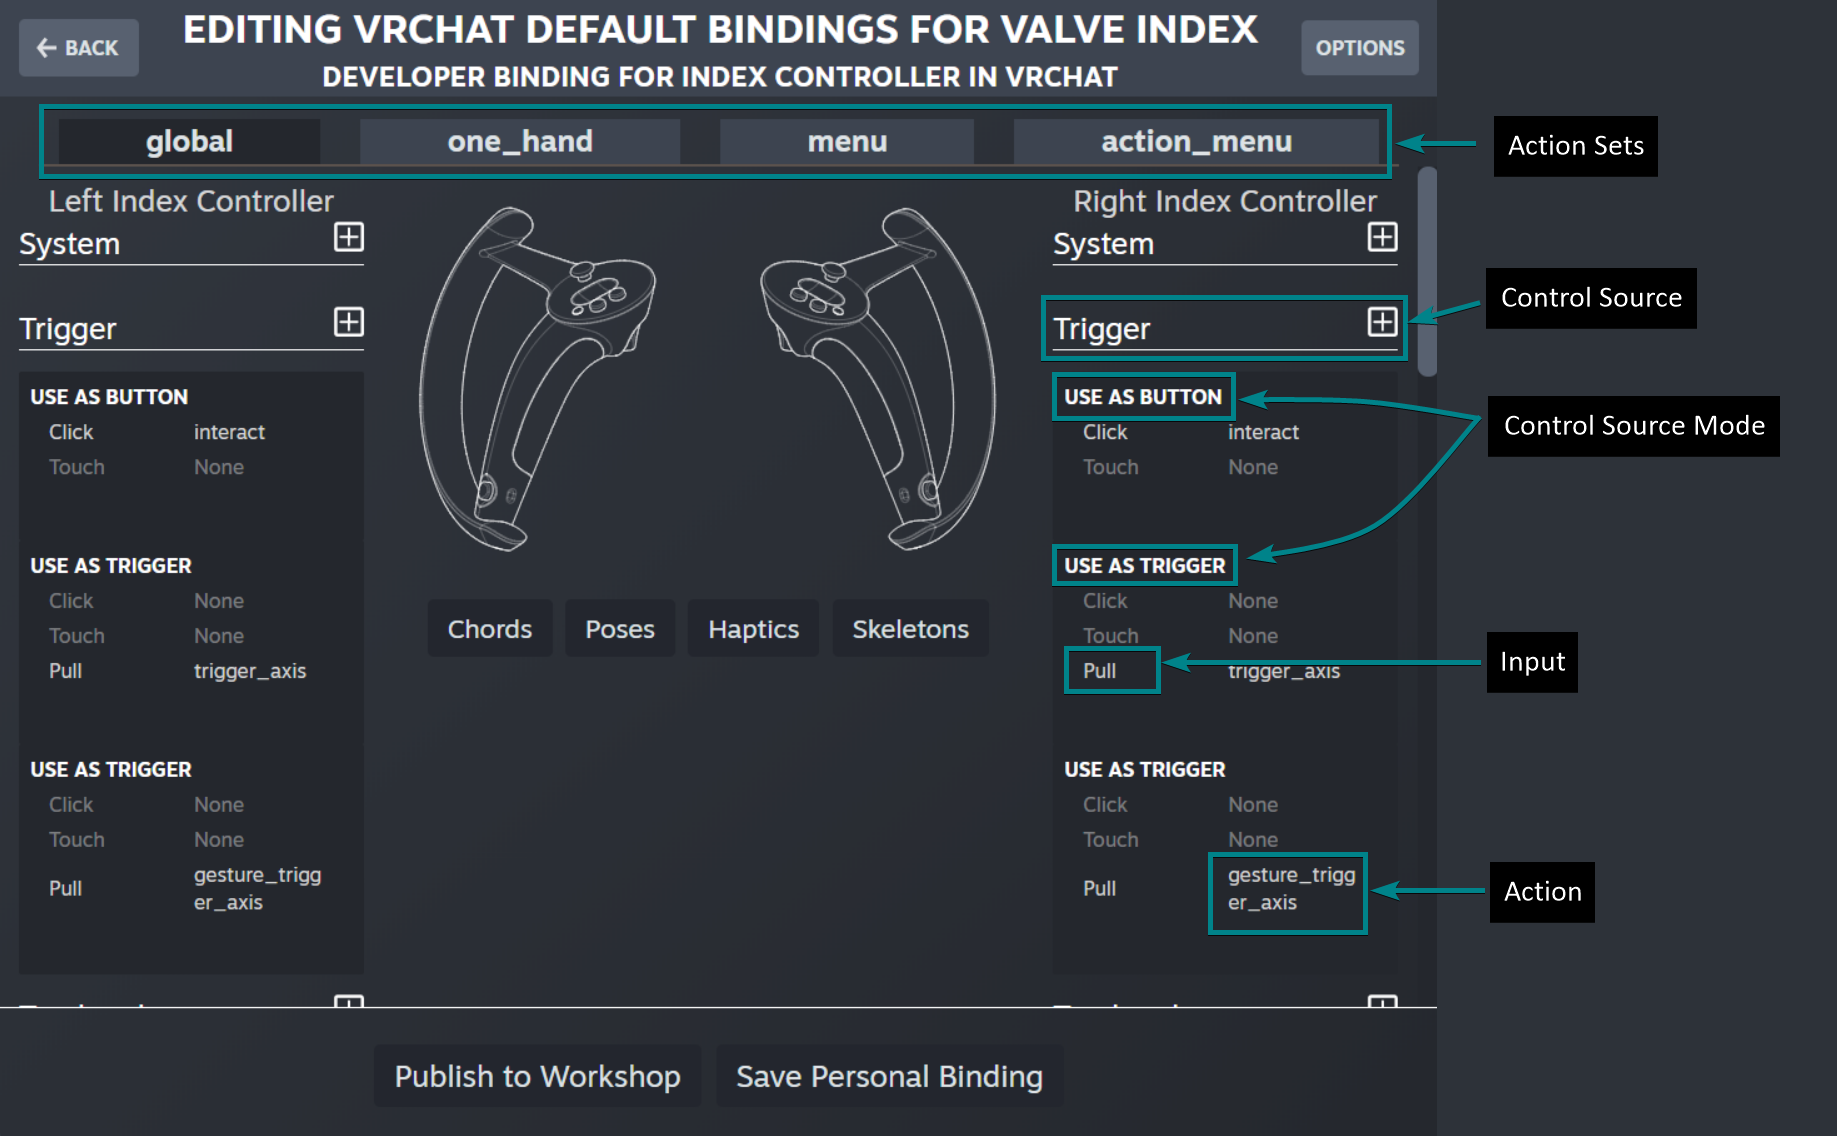
Under "Current Binding", press "Edit" to open the full binding configuration menu. This menu contains multiple pages of Action sets and configurations for each controller for each set.
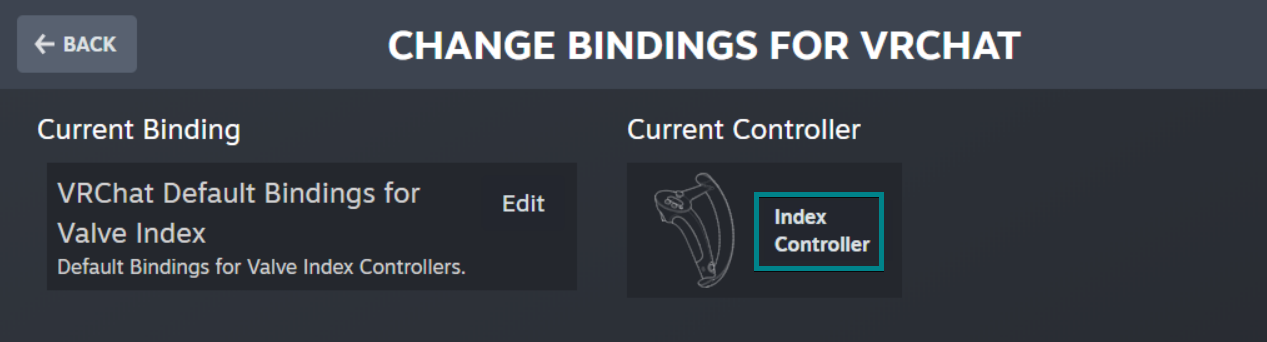
Changing Bindings for Different ControllersIf you need to set up your bindings for a different set of controllers, you can click the controller name under "Current Controller" in the "Change Bindings for VRChat" screen, and select your controller type:
Action sets
Action Sets define groups of actions for a specific context. Actions are behaviors that users can bind to controls, like movement, selection, or bringing up the camera or personal mirror.
Different actions are available in different action sets. For example, the axis action in the action_menu action set only applies to the action menu, and gesture_ actions are only available in the global action set.
VRChat has four Action sets for different contexts:
- global: Global actions that apply in all contexts.
- one_hand: One-handed actions, when one controller is powered off or unavailable. This action set is Mirrored by default.
- menu: Menu actions, used for the Quick Menu and Main Menu. This action set is Mirrored by default.
- action_menu: Action Menu actions, used for the round Action Menu. This action set is Mirrored by default.
global bindings will always be active, unless the same input is bound in another Action Set - in that case, the binding in global will be active unless you're in that other Action Set's context.
Adding/removing a binding isn't working/I can't find a binding!Make sure you're checking your bindings in each action set to make sure the action is added or removed in all of them. Specifically, global and one_hand share a lot of actions!
If you can't find a binding, make sure you check in other action sets, as many bindings are only available in certain action sets. Also, make sure you're using the correct type of binding for the action - some bindings can only be bound to Vector1 (e.g. scrolling) or Vector2 inputs (e.g. joystick position)
Bindings
Edit your Bindings Live!Bindings can be edited and tested on the fly. As soon as you change a binding, it should save and apply immediately, letting you test your new controls right away!
Control source modes
To bind actions to a control source's inputs, each control source (like a button, joystick, or trackpad) must be set up with at least one control source mode that defines what inputs are available for binding.
For example, a joystick control source can be used as a joystick (with 2-dimensional position, touch, and click inputs), as a dpad (with center, north, south, east, and west inputs), as a scroll wheel (with just one scrolling binding), or otherwise. Multiple control modes can be added for each control in each action set, which will all apply at the same time.
Once you've selected a control mode, a list of available inputs will appear. For each of these, you can bind an action. Actions can be bound to multiple inputs at once.
Some control modes have additional configuration options. You can view these additional settings via the cogwheel at the bottom right of a control source mode. For example, a trackpad input set to joystick mode might have options to set a deadzone and a maximum percentage that makes it easier to handle. You can also use these options to compensate for controllers that might not work as well as they used to.
Mirror Mode
Mirror Mode can be toggled with the "Mirror Mode" checkbox for specific action sets. Mirror Mode automatically maps the bindings on the right controller to be the same as the left.
We'd generally advise keeping mirroring enabled where available unless you have a particular binding scheme in mind.
Chords
Chords allow you to create a binding that requires multiple inputs at once to activate an action. This is useful for allowing one input to be used in multiple ways or for creating bindings that are hard to hit by accident.
When creating a chord, you first select an action, then the combination of inputs that must be active. The available inputs are based on what each control is being used as, so make sure to configure those first before setting up your chords.
Saving Bindings
While your bindings are automatically saved on the fly, you can save a preset by pressing "Save Personal Binding" and adding a title and description. Similarly, you can publish your presets to the Steam Workshop by selecting "Publish to Workshop".
I messed up my bindings!If you've got yourself stuck with a bad set of bindings, you can always go back to the default action set. Head to the bindings menu either in VR (by opening the SteamVR Settings overlay) or on the desktop (by opening the SteamVR settings menu -> Controllers -> Show Binding UI).
SteamVR bindings will not prevent you from unbinding important actions (like the menu, or movement actions) or warn about binding conflicts (like multiple inputs bound to the same action across different action sets), so be careful when creating bindings.
Bindings Glossary
- Bindings: a complete set of bindings between inputs and actions that can be saved and shared in the Steam Workshop.
- Action: behavior that can be bound to inputs or chords, like movement, selection, or bringing up the camera or personal mirror.
- Action Set: a group of actions that corresponds to a specific context, like using the menu or action menu, or global actions that are available in any context.
- Control source: a specific actuator on a controller, like a joystick, trigger, button, or trackpad.
- Control source mode: a mapping that defines how a control source's movements or sensors are interpreted as inputs. For example,a trackpad can be mapped as dpad or a button, and a joystick can be mapped as joystick or scroll wheel.
- Input: a specific movement or sensor reading from a control, interpreted through a control source mode. For example, a button's control source mode might provide touch, press, hold, or double-press inputs.
Skeletal Input
Skeletal input allows VR controllers to provide a pose to VRChat that's as accurate as the controller can capture, without needing specific support for each controller.
Skeletal Input lets VRChat handle everything from enhanced poses for controllers like HTC Vive Wands and Oculus/Quest Touch controllers to full hand poses when using Hand Tracking with compatible hardware.
Disabling Skeletal Input
If you don't like how skeletal input looks for a specific avatar, we provide a per-avatar toggle called "Legacy Fingers" to the Quick Actions in avatar's Expressions menu in the Action Menu. When toggled on, estimated and partial skeletal finger tracking (for example Quest or Index controller based) is processed through the method that we used for Index controllers in the past. This can be toggled on or off independently for each avatar. Hand Tracking will ignore this toggle, as it's not compatible with the old method.
Skeletal input can be turned off globally by disabling "Avatars Use Finger Tracking" in the Main Menu's Controls page. When toggled off, avatar hands will revert to the animated hand state even if skeletal tracking data is available. Gesture parameter detection including detection depending on finger tracking will still function, and as usual the Gestures toggle will affect how hands are animated, but this new toggle allows preventing any skeletal tracking from being applied to the avatar's hands.
Skeletal Input for Avatar Creators
To control how your avatar's hands interpret skeletal tracking information, you can adjust the muscle configuration of the finger muscles. You can learn more about this in Unity's documentation for Muscle Definitions.
To adjust where the finger sits at rest and when splayed, adjust the "Per-Muscle Settings" range (min and max) for the Finger bones. Make sure to change the ranges for both the left and right hands! You can test visually with the "Finger Open Close" and "Finger In Out" sliders under "Muscle Group Preview". Finger poses an be further fine-tuned using the Intermediate and Distal bone ranges.
Hand Tracking
VRChat supports full hand tracking (from camera tracking, gloves, and other technologies) through the SteamVR Input 2.0 API. Like the Quest version of VRChat, this allows for using your hands not just to animate your avatar but also as an input for navigating the menus, toggling your microphone, and some other inputs you'd typically use controllers for.
Like any VR application, VRChat needs to know when full hand tracking is available for this purpose. SteamVR allows any kind of controller to provide hand skeletons, not just camera based tracking systems, some of which will not be full hand tracking. The SteamVR API provides a value that describes how high-fidelity a skeleton is, and only the highest fidelity skeletons can be used for full-hand tracking. Whenever a full identity skeleton is available, VRChat will use it for inputs in addition to avatar animations.
In the SteamVR ecosystem, controller support (including virtual controllers like hands) is provided by a driver, a plugin that handles providing data for one or more controllers. To get your hand tracking working, a driver must be present and supplying information for it. In most cases, this will be handled as part of the install & setup process for your hardware. If not, you may need to install it manually or update it.
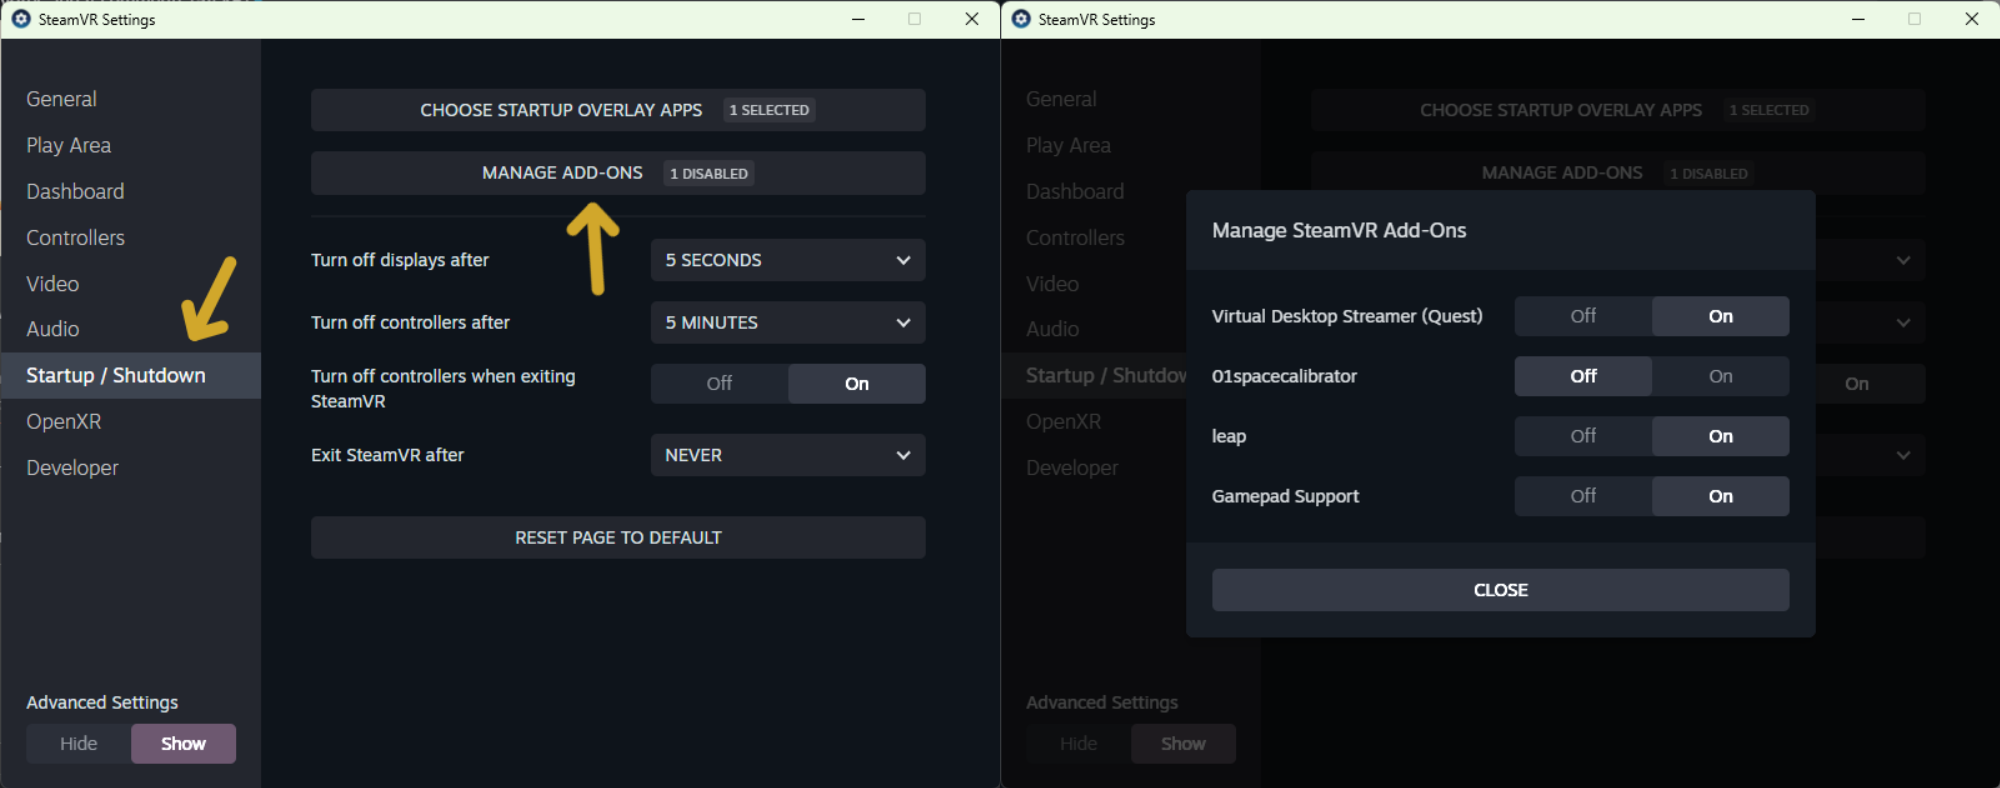
You can see which 3rd party (non-Valve) drivers you have installed by going to the SteamVR settings, selecting the 'Startup/Shutdown" page, and clicking on 'Manage Add-Ons'
SteamVR driver add-ons
Your driver may have its own configuration settings. As there is no standard location for them, these can live in various places. Your driver may provide documentation on how to use these settings.
If you are a driver author and your driver is not behaving as expected for hand tracking in VRChat, please see our SteamVR Skeletal Hand Tracking Driver Guide. (note: this page is intended for advanced driver development and not for general users)
Updated 9 months ago